Category:Views from bridges in Western Australia
Subcategories
This category has only the following subcategory.
V
Media in category "Views from bridges in Western Australia"
The following 200 files are in this category, out of 207 total.
(previous page) (next page)-
 Airport Central Station Skybridge interior, Western Australia, 11 October 2022 07.jpg 4,032 × 3,024; 2.78 MB
-
 Airport Central Station Skybridge interior, Western Australia, 11 October 2022 08.jpg 4,032 × 3,024; 2.5 MB
-
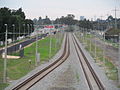
 Armadale Line north of Victoria Park Station, Western Australia, February 2023 01.jpg 4,032 × 3,024; 4.27 MB
-
 Armadale Line north of Victoria Park Station, Western Australia, February 2023 02.jpg 4,032 × 3,024; 3.5 MB
-
 Armadale Line north of Victoria Park Station, Western Australia, February 2023 03.jpg 4,032 × 3,024; 3.43 MB
-
 Armadale Line north of Victoria Park Station, Western Australia, February 2023 04.jpg 4,032 × 3,024; 3.35 MB
-
 Armadale Line north of Victoria Park Station, Western Australia, February 2023 11.jpg 4,032 × 3,024; 4.31 MB
-
 Armadale Line north of Victoria Park Station, Western Australia, February 2023 12.jpg 4,032 × 3,024; 4.61 MB
-
 Armadale Line north of Victoria Park Station, Western Australia, February 2023 13.jpg 4,032 × 3,024; 3.21 MB
-
 Armadale Line north of Victoria Park Station, Western Australia, February 2023 14.jpg 4,032 × 3,024; 3.81 MB
-
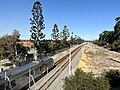
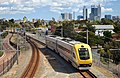
 Armadale Line viewed from the Miller Street and Roberts Road bridge, facing north 01.jpg 4,032 × 3,024; 4.56 MB
-
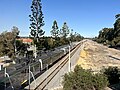
 Armadale Line viewed from the Miller Street and Roberts Road bridge, facing north 02.jpg 4,032 × 3,024; 4.97 MB
-
 Armadale Line viewed from the Miller Street and Roberts Road bridge, facing north 03.jpg 4,032 × 3,024; 4.06 MB
-
 Armadale Line viewed from the Miller Street and Roberts Road bridge, facing north 04.jpg 4,032 × 3,024; 4.54 MB
-
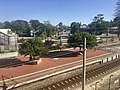
 Armadale Line viewed from the Miller Street and Roberts Road bridge, facing south 01.jpg 4,032 × 3,024; 5.08 MB
-
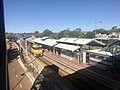
 Armadale Line viewed from the Miller Street and Roberts Road bridge, facing south 02.jpg 4,032 × 3,024; 5.05 MB
-
 Armadale Line viewed from the Miller Street and Roberts Road bridge, facing south 03.jpg 4,032 × 3,024; 5.23 MB
-
 Armadale Line viewed from the Miller Street and Roberts Road bridge, facing south 04.jpg 4,032 × 3,024; 5.28 MB
-
 Armadale Line viewed from the Miller Street and Roberts Road bridge, facing south 05.jpg 4,032 × 3,024; 5.05 MB
-
 Armadale Line viewed from the Miller Street and Roberts Road bridge, facing south 06.jpg 4,032 × 3,024; 4.74 MB
-
 Armadale Line viewed from the Miller Street and Roberts Road bridge, facing south 07.jpg 4,032 × 3,024; 4.46 MB
-
 Armadale Line viewed from the Miller Street and Roberts Road bridge, facing south 08.jpg 4,032 × 3,024; 4.53 MB
-
 Armadale Line viewed from the Miller Street and Roberts Road bridge, facing south 09.jpg 4,032 × 3,024; 1.72 MB
-
 Armadale Line viewed from the Miller Street and Roberts Road bridge, facing south 10.jpg 4,032 × 3,024; 2.4 MB
-
 Armadale Line viewed from the Miller Street and Roberts Road bridge, facing south 11.jpg 4,032 × 3,024; 4.81 MB
-
 Armadale Line viewed from the Miller Street and Roberts Road bridge, facing south 12.jpg 4,032 × 3,024; 4.84 MB
-
 Armadale Line viewed from the Miller Street and Roberts Road bridge, facing south 13.jpg 4,032 × 3,024; 4.72 MB
-
 Armadale Line viewed from the Miller Street and Roberts Road bridge, facing south 14.jpg 4,032 × 3,024; 4.94 MB
-
 Armadale Station, Western Australia, November 2023 32.jpg 4,032 × 3,024; 4.72 MB
-
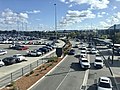
 Ashfield Station carpark, Western Australia, July 2021 01.jpg 4,032 × 3,024; 2.71 MB
-
 Ashfield Station carpark, Western Australia, July 2021 02.jpg 4,032 × 3,024; 2.95 MB
-
 Ashfield station overview.jpg 1,600 × 1,200; 507 KB
-
 Ashfield Station, Western Australia, July 2021 03.jpg 4,032 × 3,024; 2.66 MB
-
 Avonlink 2013-12-27 at East Perth 1.jpg 1,600 × 1,200; 707 KB
-
 Bassendean Station, Western Australia, January 2023 05.jpg 4,032 × 3,024; 3.31 MB
-
 Bassendean Station, Western Australia, January 2023 06.jpg 4,032 × 3,024; 3.61 MB
-
 Bassendean Station, Western Australia, January 2023 07.jpg 4,032 × 3,024; 3.71 MB
-
 Bassendean Station, Western Australia, January 2023 08.jpg 4,032 × 3,024; 3.9 MB
-
 Bassendean Station, Western Australia, January 2023 09.jpg 4,032 × 3,024; 3.64 MB
-
 Bassendean Station, Western Australia, January 2023 10.jpg 4,032 × 3,024; 2.41 MB
-
 Bassendean Station, Western Australia, January 2023 11.jpg 4,032 × 3,024; 2.33 MB
-
 Bassendean Station, Western Australia, January 2023 12.jpg 4,032 × 3,024; 2.37 MB
-
 Bassendean Station, Western Australia, January 2023 14.jpg 4,032 × 3,024; 3.3 MB
-
 Bassendean Station, Western Australia, January 2023 15.jpg 4,032 × 3,024; 3.42 MB
-
 Bassendean Station, Western Australia, January 2023 16.jpg 4,032 × 3,024; 2.24 MB
-
 Bassendean Station, Western Australia, January 2023 17.jpg 4,032 × 3,024; 2.33 MB
-
 Bassendean Station, Western Australia, January 2023 18.jpg 4,032 × 3,024; 2.36 MB
-
 Bassendean Station, Western Australia, January 2023 19.jpg 4,032 × 3,024; 2.37 MB
-
 Bassendean Station, Western Australia, January 2023 22.jpg 4,032 × 3,024; 2.49 MB
-
 Bassendean Station, Western Australia, January 2023 23.jpg 4,032 × 3,024; 2.36 MB
-
 Bennett Brook at pedestrian bridge in Caversham 02.jpg 4,032 × 3,024; 4.95 MB
-
 Bennett Brook at pedestrian bridge in Caversham.jpg 4,032 × 3,024; 5.35 MB
-
 Canning Hwy 064 E Applecross Kishorn from footbridge 2.jpg 1,600 × 1,200; 660 KB
-
 Canning Hwy 064 W Applecross Kishorn.jpg 2,048 × 1,536; 1.63 MB
-
 Claremont Station train turnback, Western Australia, March 2022 01.jpg 4,032 × 3,024; 3.35 MB
-
 Claremont Station train turnback, Western Australia, March 2022 02.jpg 4,032 × 3,024; 4.06 MB
-
 Claremont Station, Western Australia, August 2021 01.jpg 4,032 × 2,849; 3.34 MB
-
 Claremont Station, Western Australia, August 2021 02.jpg 4,032 × 3,024; 3.74 MB
-
 Cockburn stn.png 2,058 × 1,544; 3.61 MB
-
 Cockburn stn2.png 2,058 × 1,544; 3.86 MB
-
 Cottesloe station overview.jpg 1,600 × 1,200; 796 KB
-
 East Guildford Station, Western Australia, December 2022 47.jpg 4,032 × 3,024; 3.42 MB
-
 East Guildford Station, Western Australia, December 2022 49.jpg 4,032 × 3,024; 3.43 MB
-
 East Guildford Station, Western Australia, December 2022 50.jpg 4,032 × 3,024; 4.13 MB
-
 East Guildford Station, Western Australia, December 2022 51.jpg 4,032 × 3,024; 3.45 MB
-
 East Guildford Station, Western Australia, December 2022 52.jpg 4,032 × 3,024; 1.73 MB
-
 East Guildford Station, Western Australia, December 2022 53.jpg 4,032 × 3,024; 4.04 MB
-
 East Guildford Station, Western Australia, December 2022 54.jpg 4,032 × 3,024; 3.32 MB
-
 East Guildford Station, Western Australia, December 2022 55.jpg 4,032 × 3,024; 3.49 MB
-
 East Guildford Station, Western Australia, December 2022 61.jpg 4,032 × 3,024; 4.41 MB
-
 East Guildford Station, Western Australia, December 2022 62.jpg 4,032 × 3,024; 4.14 MB
-
 East Guildford Station, Western Australia, December 2022 63.jpg 4,032 × 3,024; 4.56 MB
-
 East Guildford Station, Western Australia, December 2022 64.jpg 4,032 × 3,024; 3.45 MB
-
 Edgewater Station multi-storey carpark, Western Australia, August 2021.jpg 3,521 × 2,345; 1.79 MB
-
 Edgewater Station, Western Australia, August 2021 03.jpg 4,032 × 3,024; 2.54 MB
-
 Edgewater Station, Western Australia, August 2021 04.jpg 4,032 × 3,024; 2.44 MB
-
 Glendalough railway station seen from the footbridge, October 2021 01.jpg 3,264 × 2,448; 2.02 MB
-
 Glendalough railway station seen from the footbridge, October 2021 02.jpg 3,264 × 2,448; 2.08 MB
-

-
 Guildford Road viewed from Sixth Avenue footbridge, facing east.jpg 3,696 × 2,903; 2.94 MB
-
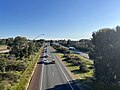
 Guildford Road viewed from Sixth Avenue footbridge, facing west.jpg 4,032 × 3,024; 3.04 MB
-
 Hotham Street Bridge from Meltham railways station footbridge 1.jpg 4,032 × 3,024; 3.44 MB
-
 Hotham Street Bridge from Meltham railways station footbridge 2.jpg 4,032 × 3,024; 3.47 MB
-
 Kwinana Freeway 046 N Como, March 2022 02.jpg 4,032 × 3,024; 2.47 MB
-
 Kwinana Freeway 046 N Como, March 2022 03.jpg 4,032 × 2,796; 2.67 MB
-
 Kwinana Freeway 046 S Como, March 2022 01.jpg 4,032 × 3,024; 2.68 MB
-
 Kwinana Freeway 046 S Como, March 2022 04.jpg 4,032 × 2,876; 3.21 MB
-
 Kwinana Freeway Widening works 2019.jpg 4,032 × 1,960; 2.08 MB
-
 Kwinana freight railway viewed from Albany Highway bridge 01.jpg 4,032 × 3,024; 4.36 MB
-
 Kwinana freight railway viewed from Albany Highway bridge 02.jpg 4,032 × 3,024; 1.7 MB
-
 Kwinana freight railway viewed from Albany Highway bridge 03.jpg 4,032 × 3,024; 4.23 MB
-
 Kwinana freight railway viewed from Albany Highway bridge 04.jpg 4,032 × 3,024; 3.81 MB
-
 Kwinana freight railway viewed from Albany Highway bridge 05.jpg 4,032 × 3,024; 1.55 MB
-
 Leach Hwy 127 Rossmoyne NE Webb.jpg 1,600 × 1,200; 467 KB
-
 Leach Hwy 127 Rossmoyne SW Webb.jpg 1,600 × 1,200; 412 KB
-
 Leighton railway overpass - panoramio.jpg 3,970 × 1,072; 849 KB
-
 Mandurah railway station, March 2022 06.jpg 3,264 × 2,448; 2.63 MB
-
 Mandurah railway station, March 2022 07.jpg 2,448 × 3,264; 2.94 MB
-
 Mandurah railway station, March 2022 08.jpg 2,448 × 3,264; 3.45 MB
-
 Mandurah railway station, March 2022 09.jpg 3,264 × 2,448; 2.64 MB
-
 Mandurah railway station, March 2022 10.jpg 3,264 × 2,448; 2.56 MB
-
 Mandurah railway station, March 2022 11.jpg 3,264 × 2,448; 3.39 MB
-
 Mandurah railway station, March 2022 12.jpg 2,448 × 3,264; 2.88 MB
-
 Mandurah railway station, March 2022 13.jpg 2,448 × 3,264; 3.11 MB
-
 Mandurah railway station, March 2022 14.jpg 3,264 × 2,448; 2.98 MB
-
 Mandurah Road from footbridge, August 2021 01.jpg 4,032 × 3,024; 1.8 MB
-
 Mandurah Road from footbridge, August 2021 02.jpg 4,032 × 3,024; 2.12 MB
-
 Mandurah Road from footbridge, August 2021 03.jpg 4,032 × 3,024; 2.26 MB
-
 Mandurah Road from footbridge, August 2021 04.jpg 4,032 × 3,024; 2.07 MB
-
 Mandurah Station, August 2021 08.jpg 4,032 × 3,024; 2.4 MB
-
 Mandurah Station, August 2021 09.jpg 4,032 × 3,024; 2.24 MB
-
 Mandurah Station, August 2021 10.jpg 4,032 × 3,024; 2.97 MB
-
 Mandurah Station, August 2021 11.jpg 4,032 × 3,024; 2.34 MB
-
 Mandurah Station, August 2021 12.jpg 4,032 × 3,024; 3.15 MB
-
 Mandurah Station, August 2021 13.jpg 4,032 × 3,024; 2.33 MB
-
 Mandurah Station, August 2021 14.jpg 4,032 × 3,024; 2.2 MB
-
 Mandurah Station, August 2021 15.jpg 4,032 × 3,024; 2.74 MB
-
 Mandurah Station, August 2021 16.jpg 4,032 × 3,024; 3.34 MB
-
 Mandurah Station, August 2021 17.jpg 4,032 × 3,024; 2.4 MB
-
 Meltham railway station from footbridge 1.jpg 4,032 × 3,024; 3.72 MB
-
 Meltham railway station from footbridge 2.jpg 4,032 × 3,024; 3.21 MB
-
 Meltham Station, Western Australia, January 2023 05.jpg 4,032 × 3,024; 3.93 MB
-
 Meltham Station, Western Australia, January 2023 06.jpg 4,032 × 3,024; 3.36 MB
-
 Meltham Station, Western Australia, January 2023 07.jpg 4,032 × 3,024; 4.01 MB
-
 Midday traffic on Kwinana Freeway Cockburn 2018.jpg 2,560 × 1,440; 1.23 MB
-
 Mitchell Freeway southbound from Glendalough station footbridge 2.jpg 4,032 × 2,859; 2.43 MB
-
 Mitchell Freeway southbound from Greenwood station bridge.jpg 4,032 × 3,024; 2.17 MB
-
 Mitchell Freeway viewed from Clarkson Station footbridge 01.jpg 4,032 × 3,024; 2.63 MB
-
 Mitchell Freeway viewed from Clarkson Station footbridge 02.jpg 4,032 × 3,024; 2.47 MB
-
 Mitchell Freeway viewed from Clarkson Station footbridge 03.jpg 4,032 × 3,024; 2.7 MB
-
 Mitchell Freeway viewed from Clarkson Station footbridge 04.jpg 4,032 × 3,024; 2.49 MB
-
 Morley–Ellenbrook Line, Bennett Springs, Western Australia, February 2024 01.jpg 4,032 × 3,024; 3.83 MB
-
 Morley–Ellenbrook Line, Bennett Springs, Western Australia, February 2024 02.jpg 4,032 × 3,024; 3.81 MB
-
 Morley–Ellenbrook Line, Bennett Springs, Western Australia, February 2024 03.jpg 4,032 × 3,024; 4.12 MB
-
 Morley–Ellenbrook Line, Bennett Springs, Western Australia, February 2024 04.jpg 4,032 × 3,024; 4.19 MB
-
 Morley–Ellenbrook Line, Bennett Springs, Western Australia, February 2024 05.jpg 4,032 × 3,024; 4.55 MB
-
 Morley–Ellenbrook Line, Bennett Springs, Western Australia, February 2024 06.jpg 4,032 × 3,024; 4.44 MB
-
 Morley–Ellenbrook Line, Bennett Springs, Western Australia, February 2024 07.jpg 4,032 × 3,024; 4.12 MB
-
 Morley–Ellenbrook Line, Bennett Springs, Western Australia, February 2024 08.jpg 4,032 × 3,024; 4.14 MB
-
 Morley–Ellenbrook Line, Bennett Springs, Western Australia, February 2024 09.jpg 4,032 × 3,024; 4.37 MB
-
 Morley–Ellenbrook Line, Bennett Springs, Western Australia, February 2024 10.jpg 4,032 × 3,024; 4.51 MB
-
 Morley–Ellenbrook Line, Bennett Springs, Western Australia, February 2024 11.jpg 4,032 × 3,024; 3.92 MB
-
 Morley–Ellenbrook Line, Bennett Springs, Western Australia, February 2024 12.jpg 4,032 × 3,024; 3.66 MB
-
 Morley–Ellenbrook Line, Bennett Springs, Western Australia, February 2024 13.jpg 4,032 × 3,024; 3.96 MB
-
 Morley–Ellenbrook Line, Bennett Springs, Western Australia, February 2024 14.jpg 4,032 × 3,024; 3.9 MB
-
 Morley–Ellenbrook Line, Bennett Springs, Western Australia, February 2024 15.jpg 4,032 × 3,024; 3.7 MB
-
 Morley–Ellenbrook Line, Bennett Springs, Western Australia, February 2024 16.jpg 4,032 × 3,024; 4.38 MB
-
 Morley–Ellenbrook Line, Bennett Springs, Western Australia, February 2024 17.jpg 4,032 × 3,024; 4.11 MB
-
 Morley–Ellenbrook Line, Bennett Springs, Western Australia, February 2024 18.jpg 4,032 × 3,024; 3.66 MB
-
 Morley–Ellenbrook Line, Bennett Springs, Western Australia, February 2024 19.jpg 4,032 × 3,024; 4.42 MB
-
 Morley–Ellenbrook Line, Bennett Springs, Western Australia, February 2024 20.jpg 4,032 × 3,024; 3.64 MB
-
 Morley–Ellenbrook Line, Bennett Springs, Western Australia, February 2024 21.jpg 4,032 × 3,024; 4.2 MB
-
 Morley–Ellenbrook Line, Bennett Springs, Western Australia, February 2024 22.jpg 4,032 × 3,024; 3.8 MB
-
 Morley–Ellenbrook Line, Bennett Springs, Western Australia, February 2024 23.jpg 4,032 × 3,024; 3.96 MB
-
 Morley–Ellenbrook Line, Noranda, Western Australia, February 2024 01.jpg 4,032 × 3,024; 3.06 MB
-
 Morley–Ellenbrook Line, Noranda, Western Australia, February 2024 02.jpg 4,032 × 3,024; 3.49 MB
-
 Morley–Ellenbrook Line, Noranda, Western Australia, February 2024 03.jpg 4,032 × 3,024; 3.41 MB
-
 Morley–Ellenbrook Line, Noranda, Western Australia, February 2024 04.jpg 4,032 × 3,024; 3.45 MB
-
 Morley–Ellenbrook Line, Noranda, Western Australia, February 2024 05.jpg 4,032 × 3,024; 3.46 MB
-
 Morley–Ellenbrook Line, Noranda, Western Australia, February 2024 06.jpg 4,032 × 3,024; 3.73 MB
-
 Morley–Ellenbrook Line, Noranda, Western Australia, February 2024 07.jpg 4,032 × 3,024; 3.53 MB
-
 Morley–Ellenbrook Line, Noranda, Western Australia, February 2024 08.jpg 4,032 × 3,024; 3.75 MB
-
 Morley–Ellenbrook Line, Noranda, Western Australia, February 2024 09.jpg 4,032 × 3,024; 3.32 MB
-
 Morley–Ellenbrook Line, Noranda, Western Australia, February 2024 10.jpg 4,032 × 3,024; 2.7 MB
-
 Morley–Ellenbrook Line, Noranda, Western Australia, February 2024 11.jpg 4,032 × 3,024; 4.47 MB
-
 Morley–Ellenbrook Line, Noranda, Western Australia, February 2024 12.jpg 4,032 × 3,024; 2.57 MB
-
 Morley–Ellenbrook Line, Noranda, Western Australia, February 2024 13.jpg 4,032 × 3,024; 3.04 MB
-
 Mount Lawley station February 2021 12.jpg 4,032 × 3,024; 3.69 MB
-
 Mount Lawley station February 2021 14.jpg 4,032 × 3,024; 3.77 MB
-
 Mounts Bay Road E from EQ footbridge.jpg 2,880 × 2,160; 1.92 MB
-
 OIC ashfield midland line towards perth.jpg 1,600 × 1,200; 595 KB
-
 OIC clarkson station 2012 view north.jpg 1,600 × 1,200; 585 KB
-
 OIC clarkson station 2012 view south.jpg 1,600 × 1,200; 544 KB
-

-
 Perth Airport Control Tower, Western Australia, October 2022.jpg 2,730 × 3,902; 1.6 MB
-
 Perth Airport Terminal 1 exterior, Western Australia, October 2022 01.jpg 4,032 × 3,024; 1.55 MB
-
 Perth Airport Terminal 1 exterior, Western Australia, October 2022 02.jpg 4,032 × 3,024; 1.43 MB
-
 Perth Airport Terminal 1 exterior, Western Australia, October 2022 03.jpg 4,032 × 3,024; 2.86 MB
-
 Perth Airport Terminal 1 exterior, Western Australia, October 2022 04.jpg 4,032 × 3,024; 2.12 MB
-
 Perth Airport Terminal 1 exterior, Western Australia, October 2022 05.jpg 4,032 × 3,024; 2.56 MB
-
 Prospector, Mt Lawley, 2013 (02).JPG 2,917 × 2,917; 3.84 MB
-
 Prospector, Mt Lawley, 2013 (03).JPG 4,532 × 2,951; 6.22 MB
-
 Roe Highway viewed from Albany Highway facing south-west 01.jpg 4,032 × 3,024; 3.64 MB
-
 Roe Highway viewed from Albany Highway facing south-west 02.jpg 4,032 × 3,024; 3.77 MB
-
 Roe Highway viewed from Albany Highway facing south-west 03.jpg 4,032 × 3,024; 3.8 MB
-
 Roe Highway viewed from Albany Highway facing south-west 04.jpg 4,032 × 3,024; 3.68 MB
-
 Roe Highway viewed from Albany Highway facing south-west 05.jpg 4,032 × 3,024; 3.41 MB
-
 Roe Highway viewed from Albany Highway facing south-west 06.jpg 4,032 × 3,024; 3.28 MB
-
 Success Hill Station, Western Australia, December 2022 13.jpg 4,032 × 3,024; 3.73 MB
-
 Success Hill Station, Western Australia, December 2022 14.jpg 4,032 × 3,024; 3.61 MB
-
 Success Hill Station, Western Australia, December 2022 15.jpg 4,032 × 3,024; 4.38 MB
-
 Success Hill Station, Western Australia, December 2022 17.jpg 4,032 × 3,024; 3.68 MB
-
 Success Hill Station, Western Australia, December 2022 18.jpg 4,032 × 3,024; 3.95 MB
-
 Success Hill Station, Western Australia, December 2022 22.jpg 4,032 × 3,024; 4.06 MB
-
 Success Hill Station, Western Australia, December 2022 23.jpg 4,032 × 3,024; 4.06 MB
-
 Success Hill Station, Western Australia, December 2022 25.jpg 4,032 × 3,024; 4.18 MB
-
 Success Hill Station, Western Australia, December 2022 26.jpg 4,032 × 3,024; 4.77 MB
-
 Success Hill Station, Western Australia, December 2022 27.jpg 4,032 × 3,024; 4.44 MB
-
 Transperth A-series train at Meltham railway station.jpg 4,032 × 3,024; 3.67 MB
-
 Transperth A-series train coming into Meltham railway station.jpg 4,032 × 3,024; 4.1 MB


.JPG)
.JPG)


