File:Deepwater Horizon oil spill recovery context.svg

Size of this PNG preview of this SVG file: 568 × 600 pixels. Other resolutions: 227 × 240 pixels | 455 × 480 pixels | 727 × 768 pixels | 970 × 1,024 pixels | 1,940 × 2,048 pixels | 8,234 × 8,693 pixels.
Original file (SVG file, nominally 8,234 × 8,693 pixels, file size: 63 KB)
File information
Structured data
Captions
Captions
Add a one-line explanation of what this file represents
| DescriptionDeepwater Horizon oil spill recovery context.svg |
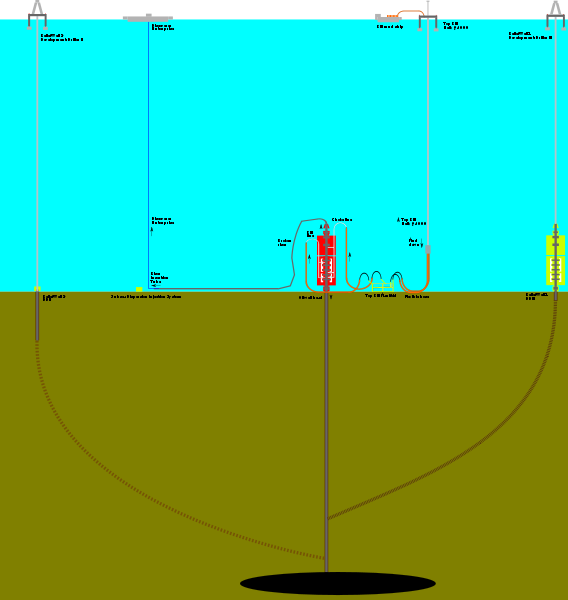
English: contextual overview of the Deepwater Horizon oil spill recovery area showing both sea surface and subsea. Scale has been altered for clarity, and only the main equipment is shown.
At the centre is a subsea blowout preventer stack installed on the seabed with a riser insertion tube in place to its left and kill and choke lines connected to a top kill mud manifold to its right. Relief wells 1 and 2 are shown at the extreme right and left, each drilling down to meet the blown centre well. Legend, referring also to this annotated diagram:
Key, referring to this annotated diagram:
|
| Date | |
| Source |
Own illustration, created with approximate reference to the following sources:
|
| Author | User:84user |
| Other versions |
        |
| Public domainPublic domainfalsefalse |
| I, the copyright holder of this work, release this work into the public domain. This applies worldwide. In some countries this may not be legally possible; if so: I grant anyone the right to use this work for any purpose, without any conditions, unless such conditions are required by law. |
This W3C-unspecified vector image was created with Inkscape .
File history
Click on a date/time to view the file as it appeared at that time.
| Date/Time | Thumbnail | Dimensions | User | Comment | |
|---|---|---|---|---|---|
| current | 02:48, 28 May 2010 |  | 8,234 × 8,693 (63 KB) | 84user (talk | contribs) | forgot to fit page to the enlarged diagram |
| 02:46, 28 May 2010 |  | 2,625 × 1,223 (63 KB) | 84user (talk | contribs) | {{Information |Description={{en|1=contextual overview of the Deepwater Horizon oil spill recovery area showing both sea surface and subsea. Scale has been altered for clarity, and only the main equipment is shown. At the centre is a subsea blowout preven |
You cannot overwrite this file.
File usage on Commons
The following 7 pages use this file:
- User:84user/gallery
- User talk:84user
- File:Deepwater Horizon oil spill recovery context.svg
- File:Deepwater Horizon oil spill recovery context bigfont.svg
- File:Deepwater Horizon oil spill recovery context maxfont.svg
- File:Deepwater Horizon oil spill recovery context numbered.svg
- File:Subsea blowout preventer stack riser mud.svg