Category:Koopa (ship, 1986)
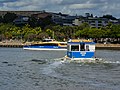
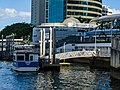
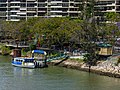
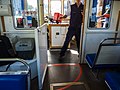
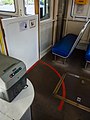
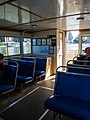
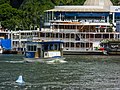
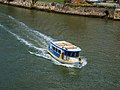
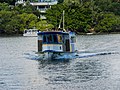
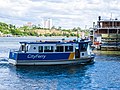
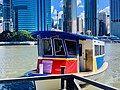
CityFerry Koopa is a monohulled ferry operating on the Brisbane River that provides mostly cross-river services.
Media in category "Koopa (ship, 1986)"
The following 78 files are in this category, out of 78 total.
-

-

-

-

-

-

-

-

-

-
 CityFerry Koopa and Captain Cook Bridge South Brisbane Reach Brisbane River P1180655.jpg 4,000 × 3,000; 8.37 MB
-
 CityFerry Koopa and Captain Cook Bridge South Brisbane Reach Brisbane River P1180656.jpg 4,000 × 3,000; 11.06 MB
-
 CityFerry Koopa and CityCat Gootcha Shafston Reach Brisbane River P1260159.jpg 4,000 × 3,000; 10.01 MB
-
 CityFerry Koopa and CityCat Kurilpa Town Reach Brisbane River Brisbane P1220896.jpg 4,000 × 3,000; 11.96 MB
-
 CityFerry Koopa and CityCat Mudherri South Brisbane Reach Brisbane River P1260121.jpg 4,000 × 3,000; 9.72 MB
-
 CityFerry Koopa and CityCat Mudherri South Brisbane Reach Brisbane River P1260122.jpg 4,000 × 3,000; 9.57 MB
-
 CityFerry Koopa and CityCat Tugulawa South Brisbane Reach Brisbane River Brisbane P1230112.jpg 4,000 × 3,000; 10.92 MB
-
 CityFerry Koopa and CityFerry Doomba Petrie Bight Brisbane River P1230526.jpg 4,000 × 3,000; 9.46 MB
-

-
 CityFerry Koopa approaches Dockside Ferry Terminal Kangaroo Point P1260161.jpg 4,000 × 3,000; 10.97 MB
-

-
 CityFerry Koopa approaches Holman Street Ferry Terminal Kangaroo Point P1220862.jpg 4,000 × 3,000; 8.85 MB
-
 CityFerry Koopa approaches Maritime Museum Ferry Terminal South Brisbane P1180657.jpg 4,000 × 3,000; 10.97 MB
-
 CityFerry Koopa approaches Maritime Museum Ferry Terminal South Brisbane P1180658.jpg 4,000 × 3,000; 10.51 MB
-
 CityFerry Koopa approaches South Bank Parklands Ferry Terminal South Brisbane P1180669.jpg 4,000 × 3,000; 9.45 MB
-
 CityFerry Koopa berthed at Eagle Street Pier Brisbane P1220856.jpg 4,000 × 3,000; 10.86 MB
-
 CityFerry Koopa berthed at Eagle Street Pier Brisbane P1220858.jpg 4,000 × 3,000; 9.96 MB
-
 CityFerry Koopa berthed at Maritime Museum Ferry Terminal South Brisbane P1180659.jpg 4,000 × 3,000; 10.41 MB
-
 CityFerry Koopa berthed at Maritime Museum Ferry Terminal South Brisbane P1180660.jpg 4,000 × 3,000; 9.37 MB
-
 CityFerry Koopa berthed at Maritime Museum Ferry Terminal South Brisbane P1180661.jpg 4,000 × 3,000; 9.64 MB
-
 CityFerry Koopa berthed at Maritime Museum Ferry Terminal South Brisbane P1180662.jpg 4,000 × 3,000; 11.79 MB
-
 CityFerry Koopa berthed at North Quay Ferry Terminal Brisbane City P1240076.jpg 4,000 × 3,000; 10.61 MB
-
 CityFerry Koopa berthed at Thornton Street Ferry Terminal Kangaroo Point P1220835.jpg 4,000 × 3,000; 11.11 MB
-
 CityFerry Koopa berthed at Thornton Street Ferry Terminal Kangaroo Point P1220836.jpg 4,000 × 3,000; 10.71 MB
-
 CityFerry Koopa departs Eagle Street Pier Ferry Terminal Brisbane P1220860.jpg 4,000 × 3,000; 10.74 MB
-
 CityFerry Koopa departs Maritime Museum Ferry Terminal South Brisbane P1180663.jpg 4,000 × 3,000; 10.29 MB
-
 CityFerry Koopa interior Brisbane River P1260106.jpg 4,000 × 3,000; 9.95 MB
-
 CityFerry Koopa interior Brisbane River P1260107.jpg 4,000 × 3,000; 7.71 MB
-
 CityFerry Koopa interior Brisbane River P1260108.jpg 3,000 × 4,000; 8.76 MB
-
 CityFerry Koopa interior Brisbane River P1260109.jpg 3,000 × 4,000; 8.97 MB
-
 CityFerry Koopa interior Brisbane River P1260110.jpg 4,000 × 3,000; 7.2 MB
-
 CityFerry Koopa interior Brisbane River P1260111.jpg 4,000 × 3,000; 8.49 MB
-
 CityFerry Koopa interior Brisbane River P1260112.jpg 4,000 × 3,000; 7.83 MB
-
 CityFerry Koopa interior Brisbane River P1260113.jpg 4,000 × 3,000; 7.75 MB
-
 CityFerry Koopa interior Brisbane River P1260114.jpg 3,000 × 4,000; 9.23 MB
-
 CityFerry Koopa interior Brisbane River P1260115.jpg 3,000 × 4,000; 10.01 MB
-
 CityFerry Koopa interior Brisbane River P1260116.jpg 3,000 × 4,000; 8.55 MB
-
 CityFerry Koopa interior Brisbane River P1260117.jpg 3,000 × 4,000; 7.37 MB
-
 CityFerry Koopa interior Brisbane River P1260118.jpg 4,000 × 3,000; 9.13 MB
-
 CityFerry Koopa interior Brisbane River P1260119.jpg 3,000 × 4,000; 8.39 MB
-

-
 CityFerry Koopa Petrie Bight Brisbane River P1230525.jpg 4,000 × 3,000; 10.21 MB
-
 CityFerry Koopa Petrie Bight Brisbane River P1230528.jpg 4,000 × 3,000; 9.52 MB
-
 CityFerry Koopa Petrie Bight Brisbane River P1230529.jpg 4,000 × 3,000; 9.55 MB
-
 CityFerry Koopa Petrie Bight Brisbane River P1230530.jpg 4,000 × 3,000; 9.96 MB
-
 CityFerry Koopa Shafston Reach Brisbane River P1230649.jpg 4,000 × 3,000; 11.32 MB
-
 CityFerry Koopa Shafston Reach Brisbane River P1260104.jpg 4,000 × 3,000; 11.2 MB
-
 CityFerry Koopa Shafston Reach Brisbane River P1260105.jpg 4,000 × 3,000; 10.93 MB
-
 CityFerry Koopa Shafston Reach Brisbane River P1260158.jpg 4,000 × 3,000; 10.5 MB
-
 CityFerry Koopa South Brisbane Reach Brisbane River Brisbane P1230111.jpg 4,000 × 3,000; 12.2 MB
-
 CityFerry Koopa South Brisbane Reach Brisbane River Brisbane P1230113.jpg 4,000 × 3,000; 10.84 MB
-
 CityFerry Koopa South Brisbane Reach Brisbane River P1180664.jpg 4,000 × 3,000; 10.06 MB
-
 CityFerry Koopa South Brisbane Reach Brisbane River P1180665.jpg 4,000 × 3,000; 10.88 MB
-
 CityFerry Koopa South Brisbane Reach Brisbane River P1180666.jpg 4,000 × 3,000; 9.75 MB
-
 CityFerry Koopa South Brisbane Reach Brisbane River P1260120.jpg 4,000 × 3,000; 8.84 MB
-

-
 CityFerry Koopa Town Reach Brisbane River Brisbane P1220853.jpg 4,000 × 3,000; 10.63 MB
-
 CityFerry Koopa Town Reach Brisbane River Brisbane P1220854.jpg 4,000 × 3,000; 11.87 MB
-
 CityFerry Koopa Town Reach Brisbane River Brisbane P1220855.jpg 4,000 × 3,000; 11.14 MB
-
 CityFerry Koopa, Brisbane 2019, 01.jpg 3,918 × 2,938; 3.98 MB
-
 CityFerry Koopa, Brisbane 2019, 02.jpg 1,772 × 2,046; 740 KB
-
 CityFerry Koopa, Brisbane 2019, 03.jpg 4,032 × 3,024; 2.59 MB
-

-

-

-

-

-

-
 View from a Ferry - panoramio.jpg 2,560 × 1,920; 1.2 MB


