Category:Photographs of the United Kingdom by Ymblanter
Media in category "Photographs of the United Kingdom by Ymblanter"
The following 200 files are in this category, out of 681 total.
(previous page) (next page)-
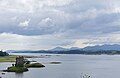 Appin Castle Stalker and Loch Laich seen from the Castle Stalker upper viewpoint.jpg 5,604 × 3,628; 8.71 MB
-
 Appin Castle Stalker and Loch Laich seen from the Castle Stalker View Cafe 1.jpg 4,680 × 3,352; 8.03 MB
-
 Appin Castle Stalker and Loch Laich seen from the Castle Stalker View Cafe 2.jpg 5,856 × 3,796; 12.59 MB
-
 Appin Castle Stalker and Loch Laich seen from the path above the shore.jpg 5,376 × 3,688; 10.52 MB
-

-
 Appin Loch Laich seen from the Castle Stalker View Cafe 1.jpg 5,772 × 3,772; 11.1 MB
-
 Appin Sgeir Bhuidhe lighthouse and Loch Laich seen from the Castle Stalker View Cafe.jpg 6,000 × 4,000; 12.71 MB
-
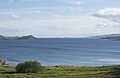
 Arduaine View of Asknish Bay from Loch Melfort Hotel 1.jpg 5,556 × 3,784; 10.13 MB
-
 Arduaine View of Asknish Bay from Loch Melfort Hotel 2.jpg 5,868 × 3,832; 11.75 MB
-
 Arduaine View of Asknish Bay from Loch Melfort Hotel 3.jpg 5,868 × 3,892; 12.57 MB
-
 Arduaine View of Asknish Bay from Loch Melfort Hotel 4.jpg 6,000 × 4,000; 13.98 MB
-
 Ballachulish Haven and Loch Leven 1.jpg 5,868 × 3,832; 12.5 MB
-
 Ballachulish Haven and Loch Leven 2.jpg 5,844 × 3,856; 11.4 MB
-
 Ballachulish Loch Linnhe seen from Glenachulish 1.jpg 6,000 × 4,000; 12.82 MB
-
 Ballachulish Loch Linnhe seen from Glenachulish 2.jpg 5,848 × 3,820; 12.39 MB
-
 Barnakill Crinan Canal Lock 12 eastern gate and Lock 11.jpg 5,796 × 3,868; 13.89 MB
-
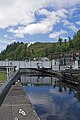
 Barnakill Crinan Canal Lock 13 seen from Lock 12.jpg 5,808 × 4,000; 12.52 MB
-
 Benderloch Ardmucknish Bay seen from A828 1.jpg 5,892 × 3,832; 11.52 MB
-
 Benderloch Ardmucknish Bay seen from A828 2.jpg 4,944 × 3,076; 7.75 MB
-
 Benderloch Ardmucknish Bay seen from A828 3.jpg 5,880 × 3,868; 13.25 MB
-
 Birnam Hotel Carter's Lodge seen from the southeast.jpg 4,000 × 5,728; 10.71 MB
-
 Birnam Hotel seen from the south.jpg 4,000 × 5,120; 10.66 MB
-
 Birnam St Mary's Episcopal Church seen from the west.jpg 4,000 × 4,928; 9.23 MB
-
 Birsay Barony Mills main building seen from the west.jpg 3,840 × 5,056; 11.64 MB
-
 Birsay Barony Mills seen from the north.jpg 6,000 × 4,000; 13.13 MB
-
 Birsay Barony Mills seen from the northeast.jpg 5,796 × 4,000; 12.98 MB
-
 Birsay Brough of Birsay seen from the southwest.jpg 5,820 × 3,736; 10.76 MB
-
 Birsay Earl's Palace and Brough of Birsay seen from Barony Mills.jpg 5,844 × 3,844; 10.47 MB
-
 Birsay Earl's Palace inside view 01.jpg 4,000 × 4,640; 8.88 MB
-
 Birsay Earl's Palace inside view 02.jpg 3,664 × 4,400; 7.54 MB
-
 Birsay Earl's Palace inside view 03.jpg 4,000 × 5,808; 13.16 MB
-
 Birsay Earl's Palace inside view 04.jpg 4,000 × 5,872; 13.12 MB
-
 Birsay Earl's Palace inside view 05.jpg 4,000 × 6,000; 13.92 MB
-
 Birsay Earl's Palace inside view 06.jpg 5,832 × 4,000; 12.01 MB
-
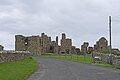
 Birsay Earl's Palace seen from the northwest.jpg 5,892 × 4,000; 11.55 MB
-
 Birsay Earl's Palace seen from the south 1.jpg 6,000 × 4,000; 12.12 MB
-
 Birsay Earl's Palace seen from the south 2.jpg 4,000 × 5,376; 10.94 MB
-
 Birsay Kitchener Memorial close-up view.jpg 3,568 × 4,976; 8.94 MB
-
 Birsay Kitchener Memorial seen from the east.jpg 5,844 × 3,820; 10.08 MB
-
 Birsay Kitchener Memorial seen from the southeast.jpg 6,000 × 4,000; 13.36 MB
-
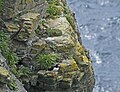
 Birsay Marwick Head Fulmar and a Fulmar chick on the rocks north of the Kitchener Memorial.jpg 4,872 × 3,556; 11.03 MB
-
 Birsay Marwick Head Puffin on the rocks northeast of the Kitchener Memoria.jpg 3,204 × 2,465; 5.21 MB
-
 Birsay Marwick Head seen from the Kitchener Memorial.jpg 6,000 × 4,000; 12.87 MB
-
 Birsay Panorama of Barony Mills seen from the north.jpg 6,000 × 4,000; 12.36 MB
-
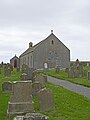 Birsay St Magnus Church seen from the east.jpg 4,000 × 5,344; 11.17 MB
-
 Birsay St Magnus Church seen from the northeast.jpg 6,000 × 4,000; 13.12 MB
-
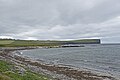 Birsay View of the coast south of the Earl's Palace.jpg 6,000 × 4,000; 13.36 MB
-
 Blackfriars Canterbury.jpg 2,736 × 3,648; 5.85 MB
-
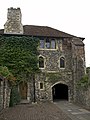
 Blackfriars former guesthouse Canterbury.jpg 3,648 × 2,736; 6.47 MB
-
 Cairnbaan Crinan Canal Boat east of Lock 5.jpg 4,000 × 6,000; 13.83 MB
-
 Cairnbaan Crinan Canal Lock 5 captain closes the western gate 1.jpg 5,772 × 4,000; 14.59 MB
-
 Cairnbaan Crinan Canal Lock 5 captain closes the western gate 2.jpg 5,784 × 4,000; 13.15 MB
-
 Cairnbaan Crinan Canal Lock 5 captain lowering the water level 1.jpg 6,000 × 4,000; 13.43 MB
-
 Cairnbaan Crinan Canal Lock 5 captain lowering the water level 2.jpg 6,000 × 4,000; 14.55 MB
-
 Cairnbaan Crinan Canal Lock 5 captain lowering the water level 3.jpg 4,000 × 6,000; 14.74 MB
-
 Cairnbaan Crinan Canal Lock 5 eastern gate boat exiting.jpg 6,000 × 4,000; 16.04 MB
-
 Cairnbaan Crinan Canal Lock 5 eastern gate half-open 1.jpg 6,000 × 4,000; 14.68 MB
-
 Cairnbaan Crinan Canal Lock 5 eastern gate half-open 2.jpg 6,000 × 4,000; 17.3 MB
-
 Cairnbaan Crinan Canal Lock 5 eastern gate open.jpg 6,000 × 4,000; 15.95 MB
-
 Cairnbaan Crinan Canal Lock 5 western gate 1.jpg 4,000 × 5,472; 12.53 MB
-
 Cairnbaan Crinan Canal Lock 5 western gate 2.jpg 4,000 × 6,000; 12.98 MB
-
 Cairnbaan Crinan Canal Lock 5 western gate boat entering.jpg 4,000 × 6,000; 12.63 MB
-
 Cairnbaan Crinan Canal Lock 5 western gate half-closed.jpg 6,000 × 4,000; 16.55 MB
-
 Cairnbaan Crinan Canal Lock 5 western gate opening.jpg 4,000 × 6,000; 12.52 MB
-
 Canterbury Beaney House.jpg 2,736 × 3,648; 4.89 MB
-
 Canterbury Blackfriars.jpg 3,648 × 2,736; 6.3 MB
-
 Canterbury Butter Market from the east corner 1.jpg 2,736 × 3,648; 5 MB
-
 Canterbury Butter Market from the east corner 2.jpg 2,736 × 3,648; 5.5 MB
-
 Canterbury Butter Market.jpg 3,648 × 2,736; 4.56 MB
-
 Canterbury Castle from the West.jpg 3,648 × 2,736; 5.39 MB
-
 Canterbury Castle Street 28.jpg 3,648 × 2,736; 5.87 MB
-
 Canterbury cathedral Columns south wall 1.jpg 3,648 × 2,736; 6 MB
-
 Canterbury cathedral Columns south wall 2.jpg 3,648 × 2,736; 6.61 MB
-
 Canterbury Cathedral from Sally's Orchard.jpg 3,648 × 2,736; 6.05 MB
-
 Canterbury Cathedral statue of Henry VIII of England.jpg 2,736 × 3,648; 5.51 MB
-
 Canterbury Cathedral the Corona.jpg 2,736 × 3,648; 4.39 MB
-
 Canterbury catherdal view from the wall.jpg 3,568 × 2,604; 5.01 MB
-
 Canterbury Christ Church Gate cathedral side.jpg 2,736 × 3,648; 4.55 MB
-
 Canterbury Christ Church Gate town side.jpg 2,736 × 3,648; 5.03 MB
-
 Canterbury city walls from pedestrian bridge.jpg 3,500 × 2,656; 4.24 MB
-
 Canterbury Conquest House.jpg 2,736 × 3,648; 4.57 MB
-
 Canterbury Great Stour and Blackfriars.jpg 2,736 × 3,648; 6.78 MB
-
 Canterbury Green Court 1.jpg 2,736 × 3,648; 5.03 MB
-
 Canterbury Green Court 2.jpg 2,736 × 3,648; 6.12 MB
-
 Canterbury Hospital Lane.jpg 2,736 × 3,648; 5.48 MB
-
 Canterbury King's School drivethrough building.jpg 2,736 × 3,648; 4.38 MB
-
 Canterbury Mercery Lane to the southeast.jpg 2,736 × 3,648; 4.65 MB
-
 Canterbury Passage north of the cathedral.jpg 2,736 × 3,648; 5.23 MB
-
 Canterbury Poor Priests Hospital from the Great Stour.jpg 2,736 × 3,648; 6.4 MB
-
 Canterbury Poor Priests Hospital.jpg 3,648 × 2,736; 5.9 MB
-
 Canterbury St Augustine's Abbey Gatehouse.jpg 2,736 × 3,648; 4.71 MB
-
 Canterbury St Augustine's Abbey Missionary School 1.jpg 3,648 × 2,736; 4.93 MB
-
 Canterbury St Augustine's Abbey Missionary School 2.jpg 3,648 × 2,736; 6.15 MB
-
 Canterbury St Augustine's Abbey Refectory and Sts. Peter and Paul Church.jpg 3,648 × 2,736; 5.04 MB
-
 Canterbury St Augustine's Abbey Rotunda and Sts. Peter and Paul Church.jpg 3,648 × 2,736; 5.4 MB
-
 Canterbury St Augustine's Abbey St. Pancras Church from the northwest.jpg 3,648 × 2,736; 5.7 MB
-
 Canterbury St Peter's Street 1.jpg 2,736 × 3,648; 5.94 MB
-
 Canterbury St. Augustine Abbey Basilica and Crypt.jpg 3,648 × 2,736; 4.97 MB
-
 Canterbury St. Augustine Abbey St. Pancras Church.jpg 3,648 × 2,736; 5.9 MB
-
 Canterbury St. Augustine Abbey Sts. Perer and Paul Church.jpg 3,648 × 2,736; 4.97 MB
-
 Canterbury St. John's Church of England Primary School.jpg 2,992 × 2,448; 3.71 MB
-
 Canterbury West Gate from the west.jpg 3,648 × 2,736; 4.35 MB
-
 Canterbury West Gate reverse side.jpg 2,736 × 3,648; 5.05 MB
-
 Greyfriars chapel Canterbury.jpg 3,648 × 2,736; 8.4 MB
-
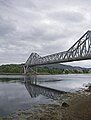
 Connel Bridge seen from the southwest 1.jpg 6,000 × 4,000; 12.79 MB
-
 Connel Bridge seen from the southwest 2.jpg 4,000 × 5,296; 10.52 MB
-
 Corsenside Hills between Ridsdale and Woodburn Station 1.jpg 6,000 × 4,000; 11.74 MB
-
 Corsenside Hills between Ridsdale and Woodburn Station 2.jpg 6,000 × 4,000; 12.36 MB
-
 Corsenside Hills between Ridsdale and Woodburn Station 3.jpg 5,808 × 3,724; 10.35 MB
-
 Corsenside Hills between Ridsdale and Woodburn Station 4.jpg 6,000 × 4,000; 13.77 MB
-
 Crinan Castle Dounie wall.jpg 6,000 × 4,000; 17.12 MB
-
 Crinan Coast seen from Castle Dounie to the north.jpg 5,868 × 3,844; 14.12 MB
-
 Crinan Coast seen from Castle Dounie to the south.jpg 3,824 × 5,776; 11.95 MB
-
 Crinan Eilean dà Mhèinn seen from the west of the village.jpg 5,714 × 3,814; 12.72 MB
-
 Crinan Forest on the Crinan Viewpoint Circular trail 1.jpg 4,000 × 6,000; 22.51 MB
-
 Crinan Forest on the Crinan Viewpoint Circular trail 2.jpg 6,000 × 4,000; 19.86 MB
-
 Crinan Garbh Rèisa and Eilean na Cille seen from Crinan Viewpoint Circular trail.jpg 5,832 × 3,856; 10.58 MB
-
 Crinan Garbh Rèisa seen from Crinan Viewpoint Circular trail.jpg 5,844 × 3,880; 10.69 MB
-
 Crinan Harbour House seen from the southwest.jpg 4,000 × 6,000; 17.85 MB
-
 Crinan Hills seen from Castle Dounie.jpg 6,000 × 4,000; 15.24 MB
-

-

-
 Crinan Island Macaskin and Eilean nan Coinein seen from Crinan Viewpoint Circular trail 3.jpg 3,776 × 5,808; 11.58 MB
-
 Crinan Island Macaskin and Eilean nan Coinein seen from Crinan Viewpoint Circular trail 4.jpg 6,000 × 4,000; 13.22 MB
-
 Crinan Island Macaskin and Eilean nan Coinein seen from Crinan Viewpoint Circular trail 5.jpg 5,868 × 3,868; 12.44 MB
-
 Crinan Island Macaskin and Eilean nan Coinein seen from Crinan Viewpoint Circular trail 6.jpg 5,724 × 3,868; 11.71 MB
-

-
 Crinan Island Macaskin seen from Crinan Viewpoint Circular trail 1.jpg 6,000 × 4,000; 13.66 MB
-
 Crinan Jura and Scarba seen from Crinan Viewpoint Circular trail 1.jpg 6,000 × 4,000; 13.91 MB
-
 Crinan Jura and Scarba seen from Crinan Viewpoint Circular trail 2.jpg 6,000 × 4,000; 13.36 MB
-
 Crinan Loch Crinan and the haven seen from the west.jpg 5,616 × 4,000; 14.49 MB
-
 Crinan Loch Crinan seen from Crinan Viewpoint Circular trail.jpg 5,820 × 3,844; 13.56 MB
-
 Crinan Loch Crinan seen from the west of the village.jpg 5,868 × 3,844; 12.41 MB
-
 Crinan Northeastern shore of Loch Crinan seen from the west of the village.jpg 5,832 × 3,856; 12.31 MB
-
 Crinan Scarba seen from Castle Dounie.jpg 6,000 × 4,000; 11.41 MB
-
 Crinan Scarba seen from Crinan Viewpoint Circular trail.jpg 5,892 × 4,000; 12.53 MB
-
 Dalmally Beinn Donachain seen from the parking lot of the Waterfall Woods Trail.jpg 6,000 × 4,000; 11.5 MB
-
 Dalmally Beinn Eunaich seen from the parking lot of the Waterfall Woods Trail.jpg 5,556 × 4,000; 13.39 MB
-
 Dalmally Forest at the An Darach Ruadh Trail.jpg 4,000 × 6,000; 15.19 MB
-
 Dalmally Lochy River seen from the An Darach Ruadh Trail.jpg 4,000 × 5,220; 17.6 MB
-
 Dalmally Oak Trees on the Waterfall Woods Trail.jpg 3,456 × 5,136; 16.21 MB
-
 Dalmally Oak wood at the An Darach Ruadh Trail.jpg 3,424 × 4,900; 15.33 MB
-
 Dalmally railway station 1.jpg 4,000 × 5,376; 11.07 MB
-
 Dalmally railway station 2.jpg 3,808 × 5,840; 13.73 MB
-
 Dalmally railway station 3.jpg 5,892 × 3,796; 13.04 MB
-
 Dalmally railway station 4.jpg 3,856 × 5,712; 11.96 MB
-
 Dalmally railway station 5.jpg 3,792 × 5,440; 12.77 MB
-
 Dalmally River Lochy waterfalls seen upfront.jpg 3,696 × 5,088; 14.83 MB
-
 Dalmally Struthiopteris spicant at the An Darach Ruadh Trail.jpg 5,160 × 3,724; 16.5 MB
-
 Dornoch Bridge Street 3.jpg 4,000 × 5,200; 12.01 MB
-
 Dornoch Castle entrance to the grounds.jpg 6,000 × 4,000; 13.76 MB
-
 Dornoch Castle seen from the north.jpg 4,000 × 6,000; 13.08 MB
-
 Dornoch Castle seen from the northwest.jpg 3,856 × 5,376; 9.78 MB
-
 Dornoch Castle Street 4 seen from the south.jpg 4,000 × 5,264; 11.96 MB
-
 Dornoch Castle Street 7.jpg 4,000 × 5,568; 10.86 MB
-
 Dornoch Castle Street The Deanery seen from the west.jpg 4,000 × 6,000; 13.47 MB
-
 Dornoch Cathedral and cemetery seen from the east.jpg 3,856 × 5,312; 10.5 MB
-
 Dornoch Cathedral ceiling.jpg 5,748 × 3,760; 18.24 MB
-
 Dornoch Cathedral north wing and organ.jpg 4,000 × 6,000; 23.62 MB
-
 Dornoch High Street 6-7.jpg 4,000 × 5,408; 12.55 MB
-
 Dornoch High Street Mercat Cross.jpg 4,000 × 6,000; 13.06 MB
-
 Dornoch Plaiden Ell.jpg 3,824 × 5,760; 16.68 MB
-
 Dornoch Station Road St Michaels.jpg 5,832 × 3,856; 13.04 MB
-
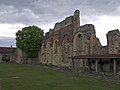
 Dryburgh Abbey Area Ruins 1.jpg 4,000 × 6,000; 13.73 MB
-
 Dryburgh Abbey Area Ruins 2.jpg 3,920 × 5,776; 13.73 MB
-
 Dryburgh Abbey Area Ruins 3.jpg 3,832 × 5,758; 15.04 MB
-
 Dryburgh Abbey Area Ruins 4.jpg 4,000 × 6,000; 16.91 MB
-
 Dryburgh Abbey Area Ruins 5.jpg 3,792 × 5,552; 15.87 MB
-
 Dryburgh Abbey Area Ruins 6.jpg 4,000 × 6,000; 17.12 MB
-
 Dryburgh Abbey Area Ruins 7.jpg 4,000 × 6,000; 15.35 MB
-
 Dryburgh Abbey Area Ruins 8.jpg 5,688 × 3,772; 15.06 MB
-
 Dryburgh Abbey Entrance alley seen from the east.jpg 4,000 × 6,000; 15.57 MB
-
 Dunadd Inauguration stone.jpg 3,664 × 5,392; 12.01 MB
-
 Dunadd River Add seen from the bridge downstream.jpg 4,000 × 6,000; 13.13 MB
-
 Dunadd River Add seen from the top.jpg 6,000 × 4,000; 11.29 MB
-
 Dunadd Rocks on the hillside 1.jpg 6,000 × 4,000; 13.65 MB
-
 Dunadd Rocks on the hillside 2.jpg 6,000 × 4,000; 15.44 MB
-
 Dunadd View from the hill to the southeast.jpg 6,000 × 4,000; 11.7 MB
-
 Dunadd View from the top to the northeast.jpg 6,000 × 4,000; 13.02 MB
-
 Dunadd View from the top to the southwest.jpg 6,000 × 4,000; 11.11 MB
-
 Dunadd View from the top to the west.jpg 5,880 × 3,856; 10.76 MB
-
 Edinburgh Alva Street seen from Stafford Street to the northeast.jpg 4,000 × 4,960; 9.28 MB
-
 Edinburgh Belford Road seen from Douglas Gardens monochrome.jpg 3,872 × 5,568; 9.83 MB
-
 Edinburgh Belford Road seen from Douglas Gardens.jpg 3,872 × 5,568; 10.28 MB
-
 Edinburgh Castle seen from Castle Street.jpg 4,000 × 6,000; 12.5 MB
-
 Edinburgh Castle seen from the Royal Academy.jpg 4,000 × 6,000; 13.27 MB
-
 Edinburgh Charlotte Lane seen from Randolph Place.jpg 4,000 × 5,424; 9.47 MB
-
 Edinburgh Charlotte Square 22 monochrome.jpg 4,000 × 6,000; 11.22 MB
-
 Edinburgh Charlotte Square 22.jpg 4,000 × 6,000; 12.21 MB
-
 Edinburgh Eglinton Crescent 4-13 monochrome.jpg 3,776 × 5,536; 7.79 MB
-
 Edinburgh Eglinton Crescent 4-13.jpg 3,776 × 5,536; 9.63 MB
-
 Edinburgh Frederick Street 19 monochrome.jpg 4,000 × 5,184; 8.61 MB
-
 Edinburgh Frederick Street 19.jpg 4,000 × 5,184; 9.53 MB
-
 Edinburgh George Street 106-110.jpg 4,000 × 6,000; 12.72 MB
-
 Edinburgh George Street 66 seen from Rose Street North Lane monochrome.jpg 4,000 × 6,000; 11.68 MB
-
 Edinburgh George Street 66 seen from Rose Street North Lane.jpg 4,000 × 6,000; 12.3 MB
-
 Edinburgh George Street 84 monochrome.jpg 4,000 × 6,000; 10.98 MB
-
 Edinburgh George Street 84.jpg 4,000 × 6,000; 12.33 MB
-
 Edinburgh Melville Street 23.jpg 4,000 × 6,000; 12.57 MB
-
 Edinburgh Melville Street 25 seen from Stafford Street.jpg 4,000 × 5,328; 9.9 MB


