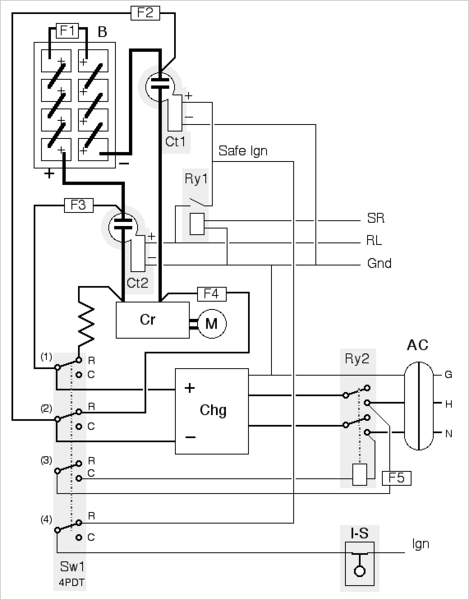
File:WPEVCContactorCharge2.png

Original file (571 × 730 pixels, file size: 10 KB, MIME type: image/png)
Captions
Captions
Summary edit
| DescriptionWPEVCContactorCharge2.png |
English: Corrections.
Contactor pre-charge and charge disconnect. See caution and disclamer at bottom of document This circuit is for use with transformerless chargers using grounded extension cord from a GFCI (Ground Fault Controlled Interrupt) protected outlet. Key to drawing:
Run charge switch notes:
Wire sizes: Charger current wires to F2, F3, F4, and charger AWG 10 typical. AC charger wires AWG 10 typical Main battery wires AWG 2/0 to 4/0 typical Relay coil wires AWG 16 or 18 typical Caution: This assumes permanent connection of the pre-charge resistor and that a sufficient interval between charging AC disconnect and system operation will allow the pre-charge resistor to fully charge the controller capacitors. Failure to allow sufficient pre-charge may damage the contactors, even welding them in the closed position. Systems providing a complete system shut-down between run conditions should use a sense or timer circuit to prevent operation until the pre-charge is complete. A mechanical charging door interlock should also prevent vehicle operation while plugged in. Drawing by User:Leonard G. Use subject to Disclaimers: Responsibility for accuracy and liabilities for application is by the user of this document, not the author, checkers, or modifiers. |
| Date | 31 October 2005 (original upload date) |
| Source | Transferred from en.wikipedia to Commons by IngerAlHaosului using CommonsHelper. |
| Author | The original uploader was Leonard G. at English Wikipedia. |
| Permission (Reusing this file) |
CC-SA. |
Licensing edit
This file is licensed under Creative Commons ShareAlike 1.0 License.
Creative Commons has retired this legal tool and does not recommend that it be applied to works. বাংলা | čeština | Deutsch | English | Esperanto | español | فارسی | suomi | français | magyar | italiano | ქართული | 한국어 | македонски | മലയാളം | português | русский | sicilianu | српски / srpski | svenska | 中文(简体) | 中文(繁體) | +/− | |
| Creative Commons ShareAlike 1.0 GenericCC SA 1.0http://creativecommons.org/licenses/sa/1.0/falsetrue |
Original upload log edit
- 2005-10-31 05:18 Leonard G. 571×730× (10743 bytes) Alternate diagram for EV conversion article {{cc-sa}}
File history
Click on a date/time to view the file as it appeared at that time.
| Date/Time | Thumbnail | Dimensions | User | Comment | |
|---|---|---|---|---|---|
| current | 12:10, 18 January 2010 |  | 571 × 730 (10 KB) | File Upload Bot (Magnus Manske) (talk | contribs) | {{BotMoveToCommons|en.wikipedia|year={{subst:CURRENTYEAR}}|month={{subst:CURRENTMONTHNAME}}|day={{subst:CURRENTDAY}}}} {{Information |Description={{en|Corrections. * <add notes here> Contactor pre-charge and charge disconnect. ''See caution and disclam |
You cannot overwrite this file.
File usage on Commons
There are no pages that use this file.