Commons:Geocoding
On Wikimedia Commons, geocoding is the practice of attaching geographic location information to media. When we geocode media on Commons we identify the latitude and longitude from where the media was recorded and attach it to the description page using a {{Location}} template. For jpeg images, geodata can also be stored in the image Exif.


Media that is geocoded can be found in Category:Media with locations.
You can find coordinates for untagged pictures in: Category:Location possible. If you see an image that needs geotags, you can add {{Location possible}}.
Geocoding media on Commons edit
Geocoding is easy and only takes a couple of steps. All coordinates should be referenced to the en:WGS84 datum, the one supported by GPS systems and Google Maps. References taken from printed maps are unlikely to use this datum, and lead to inaccuracies in the order of hundreds of metres. National Grid reference systems use a local datum so will provide the wrong result.
On Commons we record the location of the camera as accurately as we can. Pictures can be geocoded in the camera, or in your own computer, or after uploading. Some of the tools can be activated in the "gadget" tab of Special:Preferences:
- Geocoding tools: Adds three geocoding links to the toolbox: recent changes, daily error log, and search. [talk]
- Geocoding To Do: Add a tab to the category linking to the tool allowing to view images that are not geocoded. [talk]
Automatic procedures edit
GPS or other automated methods can be especially useful in rural locations without landmarks which can be easily recognized in the aerial images. If your camera has a built-in GPS receiver (as most smartphone camera phones do) then your work is already done. Since November 2011, the Upload Wizard adds the proper Geocoding Templates from the GPS data stored in your images. For pictures not uploaded through the Wizard, {{GPS EXIF}} can be added to summon a bot to code them.
You can also use a separate GPS receiver to record the location while you are recording the media, and use computer software to merge the locations into the image files. Such software uses the camera time tag in the image file to look up the coordinates from the GPS. For accurate results, the camera time must be correct or the time error entered manually. The time error can be monitored by photographing the time displayed by the GPS. Errors caused by spotty GPS coverage can be adjusted by the same tools that are used for manual geocoding, though more easily since you already have an approximate position.
By 2020 many cameras had a feature whereby they can connect to a smartphone via Wi-Fi or Bluetooth. The phone can control the camera remotely, transfer pictures from the camera, or transfer geocoordinates to the camera for insertion in the EXIF data of the picture. Some can only add coordinates after the fact, using a GPS log feature, and some can do it on the fly.
Adding Geotags before uploading edit
Some software, such as Microsoft Pro Photo Tools or darktable, allow you to add geographical information to images from a map. The upload wizard will also recognize these tags. These programs cannot add camera directions, but other programs such as Geosetter can insert metadata including: geographic coordinates of the location shooting, camera direction, and the name of the exact location.
If your camera has accidentally tagged your images with completely wrong geodata, you can remove them on a batch of pictures by using ExifToolGUI. It uses ExifTool that is also installed by Geosetter mentioned above.
Locator-tool edit
The Commons:Locator-tool allows to quickly add {{Location}} / {{Object location}} information to already uploaded images. You can specify a list of images to geocode (e.g., by querying a category), select their respective location on a map and let the {{Location}} be added/updated automatically.
Manual procedures edit
| OSM | scale |
|---|---|
| 19 | unavailable |
| 18 | 1000 |
| 17 | 3000 |
| 16 | 5000 |
| 15 | 10000 |
| 14 | 30000 |
| 13 | 50000 |
| 12 | 100000 |
| 11 | 300000 |
| 10 | 500000 |
| 9 | 1000000 |
| 8 | 2000000 |
| 7 | 3000000 |
| 6 | 5000000 |
| 5 | 10000000 |
| 4 | 30000000 |
| 3 | 50000000 |
The easiest way to identify the location in urban areas is to use an online mapping site with aerial imaging such as:
GeoLocator tool edit
Steps to obtain coordinates and build appropriate location tag:
- find your location on embedded map (move/zoom/search it as needed)
- place location marker on most exact location ([Alt+click] over your location, or by dragging a marker)
- define heading (camera view direction) from that location ([Shift+mouse move]/[Shift+click])
- copy resulting
{{location}}markup
Steps to update an existing location tag (to improve location or to add heading):
- paste existing location tag into query box and press Apply. Tag gets parsed and location will appear on a map.
- update location marker to more exact location (by dragging it or by [Alt+click] over new location)
- define heading (camera view direction) from that location ([Shift+mouse move]/[Shift+click])
- copy resulting
{{location}}markup back
Bing Maps edit
Right click where the exact location is and you have the coordinates. Paste into the Location template.
OpenStreetMap edit
- Open a new browser tab/window and load https://www.openstreetmap.org/.
- Search for the correct location; you probably want to zoom in to make this easier.
- Right-click on the exact location the media was recorded. A little pop-up menu opens there. From the pop-up menu, select Show address.
Google Maps edit
- Open a new browser tab/window and load https://maps.google.com/.
- Search for the correct location (zoom in, Satellite mode is suggested).
- Right-click on the exact location the media was recorded and select Center map here
- Click the link icon in the left sidebar
- Copy the link in the top box (do not click short url)
- Use the Coordinate conversion helper to insert the coordinates on the image page (add a heading such as "N","SE","NNW")
- Check the page for instructions on installing and using it.
Google Earth edit
- If you have Google Earth, a tool for geotagging can be installed: Ald-Hjl-Koord-en.kmz. A crosshair will appear in the middle of the Google Earth screen. Place the crosshair exactly over the camera location by moving the view, and click on it. The location template can be copied from the window that opens. (Please deactivate the tool if unused.)
- If you have coordinates in a KML file (such as created in Google Earth and exported with "Save As" or "Copy", or aided by Picasa), the kmlconvert tool can be used to convert the coordinates to Commons templates. This method is suitable for geocoding a series of images.
See en:Wikipedia:Obtaining geographic coordinates for more information.
Adding a location template edit
The use of the following templates is encouraged:
- {{Location}} for camera locations
- {{Object location}} same idea for object instead of camera locations
Do not simply invent your own new templates or copy geocoding templates from other wikis without discussion. Doing so can break the automation that reads and uses the geocoding. Commons geocoding needs are also not the same as those of other projects. Note that you also should not create your own wrappers around {{Location}} or {{Object location}}; this will break the automation as well. Just call one of the templates directly from the image description page.
Simply add {{Location|lat|long}} to the image page, filling in the lat and long from the procedure above. If the image page has an {{Information}} template, or similar, the {{Location}} template should come immediately after it. For example, the result for {{Location|37.51136|-77.602615}} will look like this:
| Camera location | | View all coordinates using: OpenStreetMap |
|---|
Alternatively, to use degrees, minutes and seconds instead of decimal degrees, add {{location|lat deg|lat min|lat sec|NS|long deg|long min|long sec|EW}} to the image page, filling in the lat and long. For example, the result for {{Location|37|30|40.9|N|77|36|9.41|W}} will look like this:
| Camera location | | View all coordinates using: OpenStreetMap |
|---|

Parameters edit
Wikipedia geocoding often uses parameters after the coordinates to give more information about the location, but some of them are not useful here.
- type and scale - The defaults are
type:landmark_scale:5000. See above for other values of scale, and the corresponding initial OSM zoom when opened via GeoHack. An explicitly given scale trumps an implicit scale value associated with an also given type. TBD: list of type values and their corresponding scale defaults for commons, dewiki, and enwiki for comparison. - dim - The dim in meters can be used for bigger areas in {{object location}}, e.g.,
type:mountain_dim:2000_scale:10000_region:PL-MA. TBD: document the effect (if any) of dim. - region - If given the region MUST be an ISO 3166-2 code, e.g., US-CA for California. The region can be used for the GeoHack selection of regional map services.
- heading - Used to indicate the direction the camera was pointing at. It is given as degree values 0-360 (clockwise with north as 0) or a compass point abbreviation as defined in w:Boxing the compass. (Example: heading:NW) Compass overlay can be displayed on Google Maps or in Google Earth to help find the correct heading, and the GeoLocator tool allows interactive picking of correct heading on a map as part of metadata authoring.
Precision edit
At the moment the named parameter prec=1000 (example) in {{Location}} or {{Object location}} is only used to truncate the displayed coordinates on the page (category, file, or gallery.) The GeoHack map service still gets the full coordinates as specified without indication of the desired precision. The effect depends on the position (see below) and on the display style (decimal ddd.nnnnnn vs. ddd°mm′ss.nnn″), e.g., prec=1000 removes the ss.nnn″ (seconds) display everywhere on earth, while prec=100 only removes .nnn (decimal fractions of seconds.)
The linear measurement of a longitudinal angle varies according to latitude. If we are aiming to a precision of about 0.5–1 m, then it is appropriate to use decimal degrees with 5 decimal places. For the minute/second format, seconds with 1 decimal place will similarly give precision of about 1.5–3 meters of real earth surface. More decimal places have not sense because available maps and navigations are not more precise.
| Latitude | Town | Degree ° | Minute ′ | Second ″ | Decimal Degree at 4 dp |
|---|---|---|---|---|---|
| 60 | Saint Petersburg | 55.65 km | 0.927 km | 15.42 m | 5.56 m |
| 51° 28′ 38″ N | Greenwich | 69.29 km | 1.155 km | 19.24 m | 6.93 m |
| 45 | Bordeaux | 78.7 km | 1.31 km | 21.86 m | 7.87 m |
| 30 | New Orleans | 96.39 km | 1.61 km | 26.77 m | 9.63 m |
| 0 | Quito | 111.3 km | 1.855 km | 30.92 m | 11.13 m |
Note that latitudinal degrees do not vary significantly across the Earth, having a surface precision of 1" = 31 m or 0.0001° = 11 m. See en:Geographic coordinate system for more information.
Stats edit
For actual number of geocoded files, see category:Media with locations.
-
 Geocoded images on Commons, March 2007 - mid 2010
 -
 Geolocated images in Wikimedia Commons 2012-01-21
 -
 Geolocated images in Wikimedia Commons 2014-02-21
 -
 Geolocated images in Wikimedia Commons 2015-01-07
 -
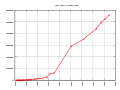 Geocoded images on Commons, March 2007 - mid 2015


(See File_talk:Commons_geocoding_graph.svg for numbers)
Use of the information edit
Clicking on the coordinates on an image page will lead to a list of various services that can show the location. It is also possible to browse Commons images on a map:
- Geocoded images from Commons plotted in OSM per WikiMap tool (lat/lon/zoom parameters or whole cat possible).
- WikiShootMe shows maps of photos and Commons objects that have or lack a photo.
- A mini world map with thumbnails of geocoded images can be found from WikiMiniAtlas on Commons.
- Some geocoded images from Commons plotted in Open Street Map (images tagged with {{Object location}} are not displayed).
Some geocoded images from Commons plotted in Google Maps (images tagged with {{Object location}} are not displayed).– this service is no longer available- KML-file of some geocoded images from Commons for use in Google Earth: GeoCommons (images tagged with {{Object location}} are not displayed).
- In the "gadget" tab of Special:Preferences, there is an option "View category on Google maps". If enabled, this adds a link "map" to all categories. This shows the location of geocoded images in the category on Google maps.
- Adding {{Geogroup}} to a category page adds links to view the images in the category with various maps.
Warnings:
- Services displaying the tagged images (categories, articles etc.) in the map have frequent link failures. Try to click a little later.
- Indexing of the database is often delayed. A new image can appear in the map almost immediately, or after several days or even several weeks or months.
- The number of image-icons displayed in the linked maps is very limited, i.e. the map can display only some of the geocoded images from the displayed area. To display more images of a specific place, you can zoom in or shift to a less crowded area.
- At OpenStreetmap, icons with identical or nearby coordinates cover one another; only the top one is available to be clicked.
Tools providing map outputs:
Things to do edit
- Add geocoding to any location related media on Commons. Areas you know personally are easiest, but geocoding images from other areas based on satellite data and other photos is also possible. For help in finding material to work on, choose an interesting category and enter the name in this tool to see a gallery of images that need to be geocoded.
- Find coordinates for pictures tagged with {{Location possible}} in: Category:Location possible.
- Refine inaccurate geocoding on images that are off the correct camera location, or have been positioned in the exact same place as a number of other images (see
list) - Monitor and fix tags of images with incorrect geocoding in Category:Media with erroneous locations and recently geocoded images (gallery).
- Find coordinates with unknown headings and try to fix them (see list).
- Verify or fix coordinates of images imported from external sources where geocoding may be less conscientious (see for example Flickr images)
- Add camera heading for the images which contain coordinates without it.
Participants edit
- Giovanni Ussi
- Gmaxwell
- evrik
- Dschwen
- Kolossos
- Arcy
- para
- Wsiegmund
- EugeneZelenko
- VanHelsing.16
- Qyd
- bdesham
- Simonizer
- Digon3
- Jarekt
- Michael Büker
- Aldaron
- Michiel1972
- Kimzoe200
- Padraic
- Sten
- Moxfyre
- Huwmanbeing
- Twice25
- AB
- Imcall
- Aviceda
- DirkvdM
- ClemRutter
- Helentr
- Liamgabby66
- Diliff
- Korax1214
- Richard001 (talk)
- Rodhullandemu (talk)
- Nichalp (QTH = 18.56 N, 72.82 E, 12 m)
- fr: user: Jean-Louis Hens
- Specious
- Giorgiomonteforti
- Slaunger
- CT Cooper
- PhilipMay
- KenWalker
- Jim.henderson
- Jeriby
- Gapo
- Igors Jefimovs
- Senator2029
- Smoth 007
- Enock4seth
- Emw
- epolk
- be..anyone
- Kelly
- Almondega
- Jason
- Aabdullayev851
- Siddikbabu
- Goutam1962 (talk) 16:59, 16 April 2017 (UTC)
- Iketsi
- Augusthorsesdroppings10
- ActuallyNeverHappened02
See also edit
- Geocode Users with MediaWiki:Geocode Users.js
- Commons:Geocoding/Panorama Project to overlay Wikipedia-POIs over a panorama photo.
- /Overlay sub-project for creating KML map overlays on Commons.
- MediaWiki:Exif-coordinate-format controls the formatting for GPS information embedded in the EXIF metadata of images; further info.